Creating a xeriscape in your Gilbert yard is a smart way to conserve water while still enjoying a beautiful outdoor space. But where do you begin? This 10-step checklist walks you through the process of planning, prepping, planting and maintaining a thriving xeriscape that’s tailored to Gilbert’s climate. By following these steps, you’ll be well on your way to a water-wise landscape you can enjoy for years to come.
1. Assess Your Yard’s Conditions
Before you start designing your xeriscape, take stock of your yard’s unique characteristics. Note sunny and shady areas, low spots that collect water, and any existing features you want to keep like mature trees or hardscaping. Also consider your soil type – Gilbert yards often have clay soil that drains slowly.
Jot down your yard’s measurements too. Knowing the square footage of planting areas will help you calculate how many plants and materials you’ll need later on. Take photos of your yard from different angles for reference as you plan.
2. Create Hydrozones Based on Water Needs
Xeriscapes conserve water by grouping plants with similar moisture needs together in “hydrozones”. This allows you to water efficiently, giving each zone only as much irrigation as it requires. Typically, a xeriscape has three hydrozones:
- Low water use (xeric) zone with native/adapted plants that need no supplemental irrigation once established
- Moderate water use zone for low-water plants that need occasional irrigation during dry spells
- High water use (oasis) zone for thirstier plants that want regular irrigation, like a small patch of lawn
Sketch out a rough plan for your yard’s hydrozones. Place the higher water zones nearest the house where they’re easiest to irrigate, and the lower zones further out. Also consider microclimates – put high water plants in naturally wetter, shadier areas and low water ones in sunnier, drier spots.
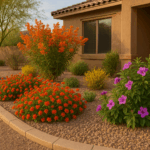
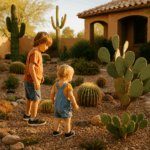
3. Design with Native and Adapted Plants

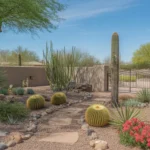
The plant palette is the heart of a successful xeriscape. Opt for a mix of native plants and non-natives adapted to Gilbert’s climate, like those from the Mediterranean or Australia. They’ll thrive in our hot, dry summers and mild winters with minimal water and care. Some great options for Gilbert xeriscapes include:
- Trees: desert willow, palo verde, mesquite
- Shrubs: creosote, texas sage, damianita
- Perennials: penstemon, desert marigold, globe mallow
- Groundcovers: evening primrose, verbena, myoporum
- Succulents: agave, yucca, hesperaloe
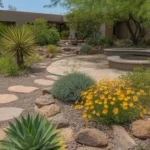
As you design with native plants, aim for a naturalistic look that mimics how they grow in the wild – in organic clumps and drifts rather than stiff rows. Repeat some plants throughout the design to visually tie the space together.
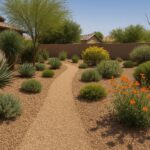
4. Plan for Permeable Hardscaping
Hardscaping is an important part of any xeriscape, providing structure, paths, patios and visual interest. But traditional solid surfaces like concrete don’t allow water to percolate into the soil. Instead, opt for permeable paving materials that let moisture soak through:
- Gravel
- Permeable pavers with sand or gravel joints
- Spaced flagstone with gravel in between
- Stabilized decomposed granite
Permeable paving keeps water on your property to nourish plants, and reduces runoff that can carry pollutants into storm drains. As a bonus, it often costs less than solid paving. Plan to direct rainwater runoff from hard surfaces into planting areas to make the most of our limited rainfall.
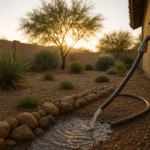
5. Map Out an Efficient Irrigation System
While established xeriscapes need little to no supplemental water, new plantings will require regular irrigation to get established, especially if planted in spring or summer. Plan for an efficient drip system with emitters sized for each hydrozone’s specific needs.
Place emitters at each plant’s root zone and run tubing under a layer of mulch to minimize evaporation. Include a smart controller that adjusts watering based on weather and soil moisture for maximum efficiency. Also consider adding a greywater system to reuse household wastewater for irrigation.
6. Prep the Soil and Grade
Now it’s time to get your hands dirty and start prepping your xeriscape area. Remove any existing turf grass or weeds, taking care to get all the roots. If your soil is compacted, till it 6-8 inches deep to loosen it up and improve drainage.
Add a 2-3 inch layer of compost and till again to mix it in. This will enrich the soil with organic matter, beneficial microbes and nutrients to give your plants a healthy start. Finally, grade the soil surface to create gentle berms and swales that will help collect and direct rainwater to planting areas.
7. Install Hardscaping and Irrigation
With the soil prepped, you can install your permeable hardscaping and irrigation system. Start with any large features like retaining walls or dry creek beds, then add gravel paths and patios. Use a level to ensure surfaces are even and stable.
Next, lay out your drip tubing and emitters according to the irrigation plan, starting with the valve box and pressure regulator. Use tubing stakes to secure everything in place. Connect the valve to your main water supply and controller, then test the system and check for leaks or clogs before covering with mulch.
8. Plant in Fall for Best Results
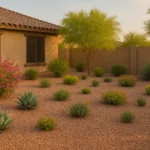
In Gilbert, fall is the ideal time to plant most xeriscape plants. The cooler temperatures and winter rains help plants establish deep roots before the stress of summer heat. Plant from late September through early November for best results.
Set plants in the ground at the same depth they were in their nursery pots. Soak the root balls before planting and water deeply right after. Aim to space new plants about 2/3 of their mature width apart – they may look small at first but will quickly fill in over their first year.
9. Mulch Planting Areas
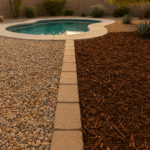
Once everything is planted, add a 2-3 inch layer of organic mulch to all exposed soil surfaces. Mulch is a xeriscape essential – it helps retain soil moisture, moderates temperature, prevents weeds and gives planting areas a finished look.
Gravel can also make an attractive mulch, especially in unplanted areas between trees and shrubs. Opt for 3/8 inch or 1/4 inch gravel in a natural color that complements your home’s exterior. Plan for a depth of 2-3 inches to effectively suppress weeds and retain moisture.
10. Maintain for Long-Term Success
While xeriscapes are relatively low-maintenance, regular upkeep will keep your plants healthy and your landscape looking its best. Monitor soil moisture and water deeply but infrequently during dry spells – plants in the low and moderate hydrozones can often get by on a deep monthly soak once established.
Prune trees and shrubs annually in late spring to remove any dead, damaged or crossing branches. Shear spent flowers on perennials to encourage fresh blooms. Replenish mulch each spring to maintain proper depth. Finally, watch for any signs of pests or disease and address issues promptly to prevent spread.
“The key to a thriving xeriscape is selecting plants that are naturally adapted to our desert climate. By choosing native and desert-friendly species and grouping them by water needs, you can enjoy a beautiful landscape that conserves water and attracts wildlife. Proper soil prep, efficient irrigation and mulch are also essential for success.”
– Ana P., Landscape Designer, Gilbert
By following this 10-step checklist, you’ll be able to transform your Gilbert yard into an attractive, water-wise xeriscape. With thoughtful planning, preparation and plant selection, you can create an outdoor space that’s sustainable, low-maintenance and uniquely adapted to our local climate. By making the switch to xeriscape, you’ll not only save water, time and money, but also contribute to preserving the natural beauty of the Sonoran Desert we call home.